Today, we have access to many powerful technologies for deciphering the principles that govern cell structure and activity. But the earliest cell biologists began their explorations by simply looking at tissues and cells. Over time, they would try to break cells open or slice tissues thinly enough to reveal their contents. The results of these pioneering efforts must initially have been baffling. What would budding cell biologists have made of this collection of tiny whorls and discs and blobs—objects whose relationship to the properties of living matter no doubt seemed an impenetrable mystery? It would take decades—even centuries—of additional investigation to unravel the sophisticated functions of these mysterious cell structures. Nevertheless, it was the visual investigation of biological materials that served as the first step toward understanding the workings of cells and tissues, and this approach remains essential in modern studies of cell biology.
Cells themselves were not seen directly until the seventeenth century, when the instrument we call a microscope was invented. For hundreds of years afterward, everything that was known about cells was discovered using this device. Light microscopes use visible light to illuminate specimens, and they allowed biologists to view for the first time the intricate and interdependent structures that provide the foundation for all living things.
Although these instruments now incorporate many sophisticated improvements, the properties of light—specifically its wavelength—limit the fineness of detail these microscopes reveal: it is simply not possible, using visible light, to distinguish objects beyond a certain resolution. Electron microscopes, invented in the 1930s, go beyond this limit by using beams of electrons instead of beams of light as the source of illumination; because electrons have a much shorter wavelength, these instruments greatly extend our ability to see the fine details of cell structure and even render some of its larger molecules visible individually.
In this section, we describe various forms of light and electron microscopy. These vital tools in the modern cell biology laboratory continue to improve, revealing new and sometimes surprising details about how cells are built and how they operate.
The Invention of the Light Microscope Led to the Discovery of Cells
By the seventeenth century, glass lenses were powerful enough to permit the detection of structures invisible to the naked eye. Using an instrument equipped with such a lens, Robert Hooke examined a piece of cork and in 1665 reported to the Royal Society of London that the cork was composed of a mass of minuscule chambers. He called these chambers “cells,” based on their resemblance to the simple rooms occupied by monks in a monastery. The name stuck, even though the structures Hooke described were actually the cell walls that remained after the plant cells living inside them had died. But it didn’t take long for Hooke and other early microscopists to spy, for the very first time, a variety of living cell types. Dutch scientist Antonie van Leeuwenhoek, for example, discovered that even a single drop of pond water contains a previously unseen world teeming with tiny creatures—twirling, tumbling, and occasionally oozing along as they went about the business of being alive.
QUESTION 1–3
You have embarked on an ambitious research project: to create life in a test tube. You boil up a rich mixture of yeast extract and amino acids in a flask, along with a sprinkling of the inorganic salts known to be essential for life. You seal the flask and allow it to cool. After several months, the liquid is as clear as ever, and there are no signs of life. A friend suggests that excluding the air was a mistake, since most life as we know it requires oxygen. You repeat the experiment, but this time you leave the flask open to the atmosphere. To your great delight, the liquid becomes cloudy after a few days, and, under the microscope, you see beautiful little cells that are actively growing and dividing. Does this experiment prove that you somehow managed to create life from inanimate materials? How might you redesign your experiment to allow air into the flask, yet eliminate the possibility that contamination by airborne microorganisms is the explanation for the results? (For a ready-made answer, look up the classic experiments of Louis Pasteur.)
For almost 200 years, light microscopes remained exotic devices, available only to a few wealthy individuals. It was not until the nineteenth century that microscopes began to be used widely to look at cells. The emergence of cell biology as a distinct science was a gradual process to which many individuals contributed, but its official birth is generally said to have been signaled by two publications: one by the botanist Matthias Schleiden in 1838 and the other by the zoologist Theodor Schwann in 1839. In these papers, Schleiden and Schwann documented the results of a systematic investigation of plant and animal tissues with the light microscope, showing that cells were the universal building blocks of all living tissues. Their work, and that of other nineteenth-century microscopists, slowly led to the realization that all living cells are formed by the growth and division of preexisting cells—a principle sometimes referred to as the cell theory (Figure 1–5). The implication that living organisms do not arise spontaneously but can be generated only from preexisting organisms was hotly contested, but it was finally confirmed in the 1860s by an elegant set of experiments performed by Louis Pasteur (see Question 1–3).
More information
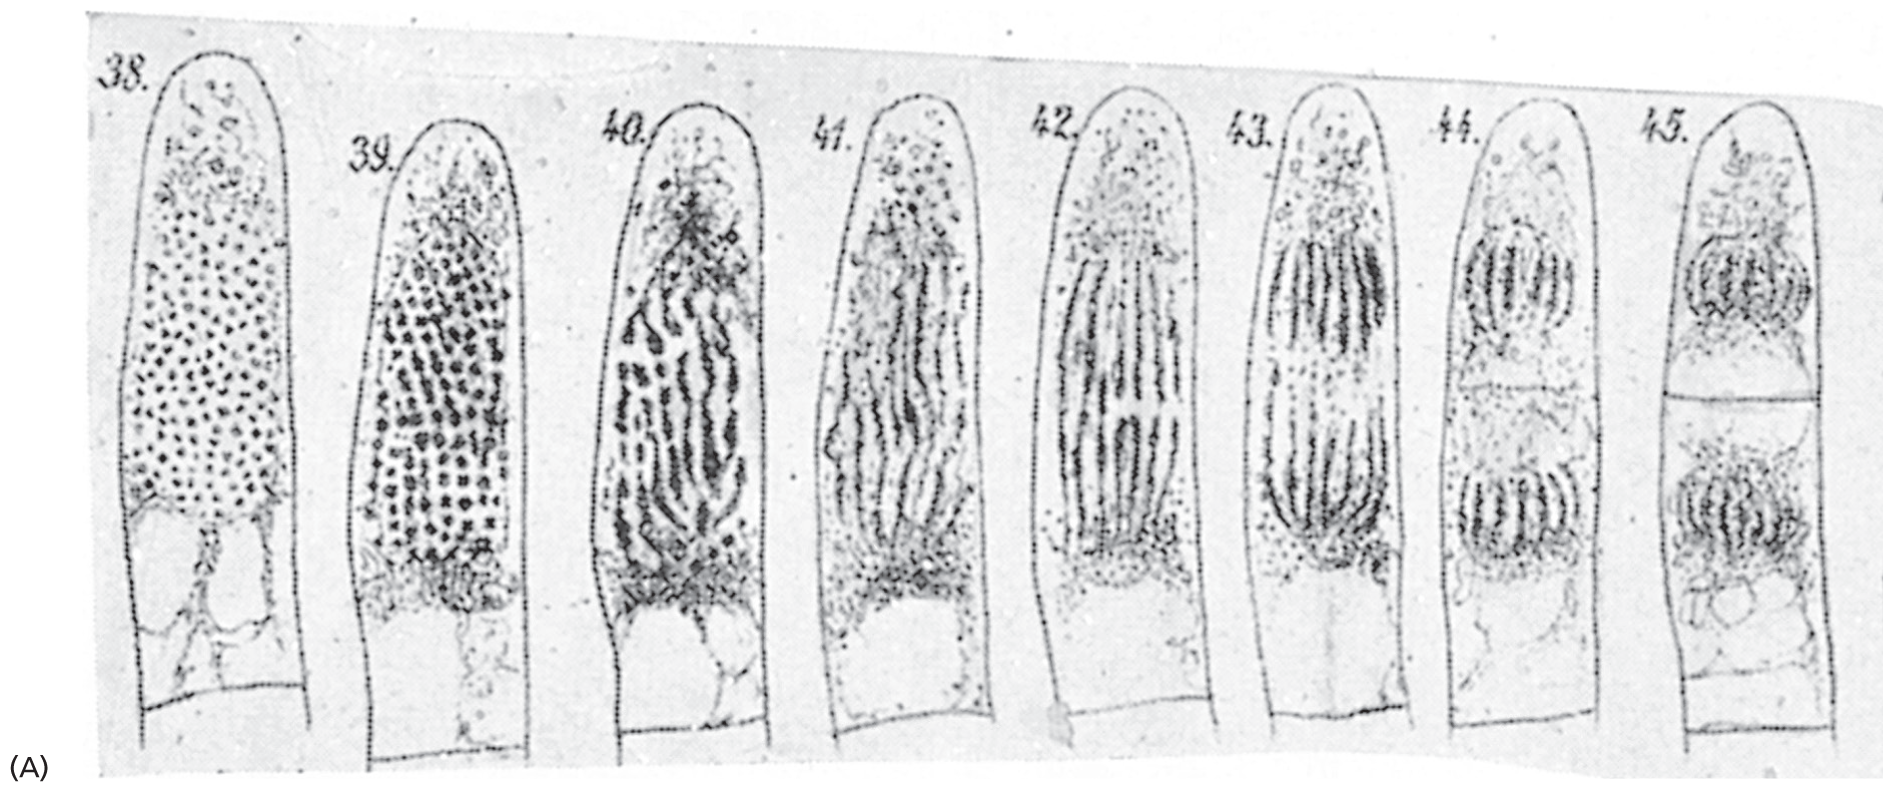
Eight drawings of the stages of cell division. The first drawing shows a single cell, with darkened spots, which transform into striations in the following drawings and then the cell divides into two segments. The schematics are numbered from 38 through 45.
More information
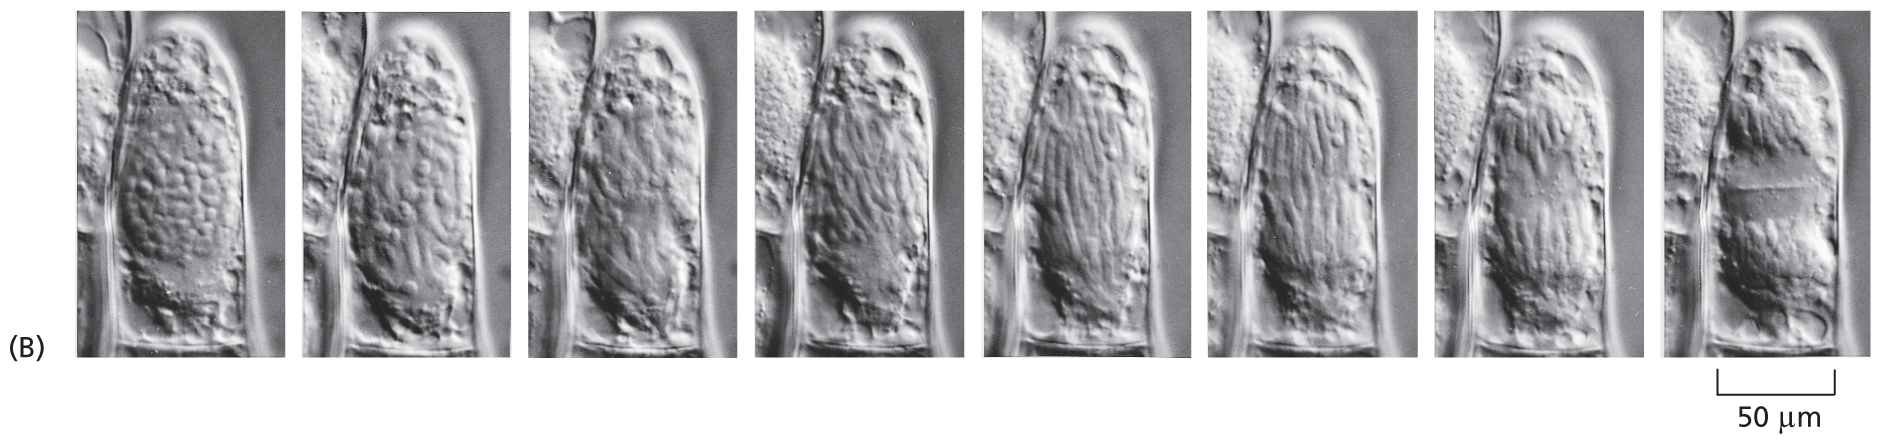
Eight micrographs of the stages of cell division. The first micrograph shows a single cell, with darkened spots, which transform into striations in the following micrographs and then the cell divides into two segments. The width of the cells is around 50 micrometers.
Figure 1–5New cells form by growth and division of preexisting cells. (A) In 1880, Eduard Strasburger drew a living plant cell (a hair cell from the common spiderwort, Tradescantia virginiana), which he observed dividing in two over a period of 2.5 hours. Inside the cell, DNA (black) can be seen condensing into chromosomes, which are then segregated into the two daughter cells. (B) A comparable living plant cell photographed through a modern light microscope. (B, from P.K. Hepler, J. Cell Biol. 100:1363–1368, 1985. With permission from Rockefeller University Press.)
The principle that cells are generated only from preexisting cells and inherit their characteristics from them underlies all of biology and gives the subject a unique flavor: in biology, questions about the present are inescapably linked to conditions in the past. To understand why present-day cells and organisms behave as they do, we need to understand their history, all the way back to the misty origins of the first cells on Earth. Charles Darwin provided the key insight that makes this history comprehensible. His theory of evolution, published in 1859, explains how random variation and natural selection gave rise to diversity among organisms that share a common ancestry. When combined with the cell theory, the theory of evolution leads us to view all life, from its beginnings to the present day, as one vast family tree of individual cells. Although this book is primarily about how cells work today, we will encounter the theme of evolution again and again, because evolution explains how cells acquired their characteristic features.
Light Microscopes Reveal Some of a Cell’s Components
If a very thin slice is cut from a suitable plant or animal tissue and viewed using a light microscope, it is immediately apparent that the tissue is divided into thousands of small cells. In some cases, the cells are closely packed; in others, they are separated from one another by an extracellular matrix—a dense material often made of protein fibers embedded in a gel of long sugar chains. Each cell is typically about 5–20 μm in diameter. If care has been taken to keep the specimen alive, particles will be seen moving around inside its individual cells. On occasion, a cell may even be seen slowly changing shape and dividing into two (see Figure 1–5).
Distinguishing the internal structure of a cell is difficult, not only because the parts are small, but also because they are transparent and mostly colorless. One way around the problem is to stain cells with dyes that color particular components differently (Figure 1–6). Alternatively, one can exploit the fact that cell components differ slightly from one another in refractive index, just as glass differs in refractive index from water, causing light rays to be deflected as they pass from the one medium into the other. The small differences in refractive index can be made visible by specialized optical techniques, and the resulting images can be enhanced further by electronic processing (Figure 1–7A).
More information
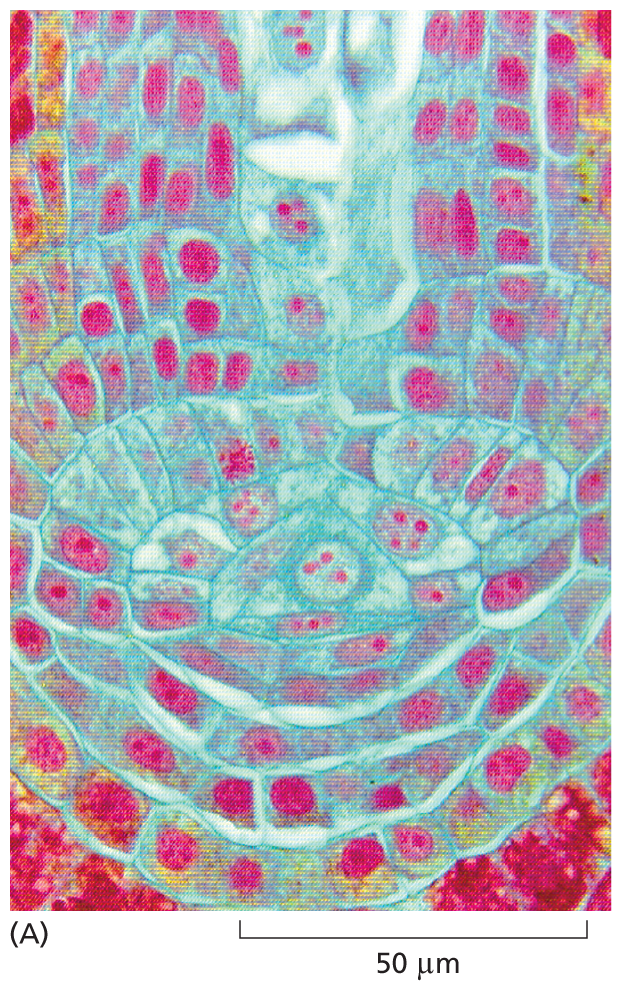
A micrograph shows cells from the root tip of the fern, approximately 10 micrometers in diameter. The cells are densely packed and form a curved shape at the tip of the root. The nuclei of the cells are red and the cell walls are blue. At the bottom of the image, where the cells curve, the nuclei take up more space in the cell than they do further up in the root.
More information
A micrograph shows shows small intestine cells, approximately 75 micrometers in diameter. The micrograph shows rings of cells with nuclei. Some of the cells are scattered in the intercellular space between the cells.
Figure 1–6Cells form tissues in plants and animals. (A) Cells in the root tip of a fern. The DNA-containing nuclei are stained red, and each cell is surrounded by a thin cell wall (light blue). The cells at the bottom corners of the preparation are so densely packed that only the red nuclei are readily visible. (B) Cells in the urine-collecting ducts of a human kidney. Each duct appears in this cross section as a ring of closely packed cells (with nuclei stained dark blue). The rings are surrounded by extracellular matrix, stained light purple, which contains the scattered cells that produced most of the matrix components. (A, courtesy of James Mauseth; B, Jose Luis Calvo/Shutterstock.)More information
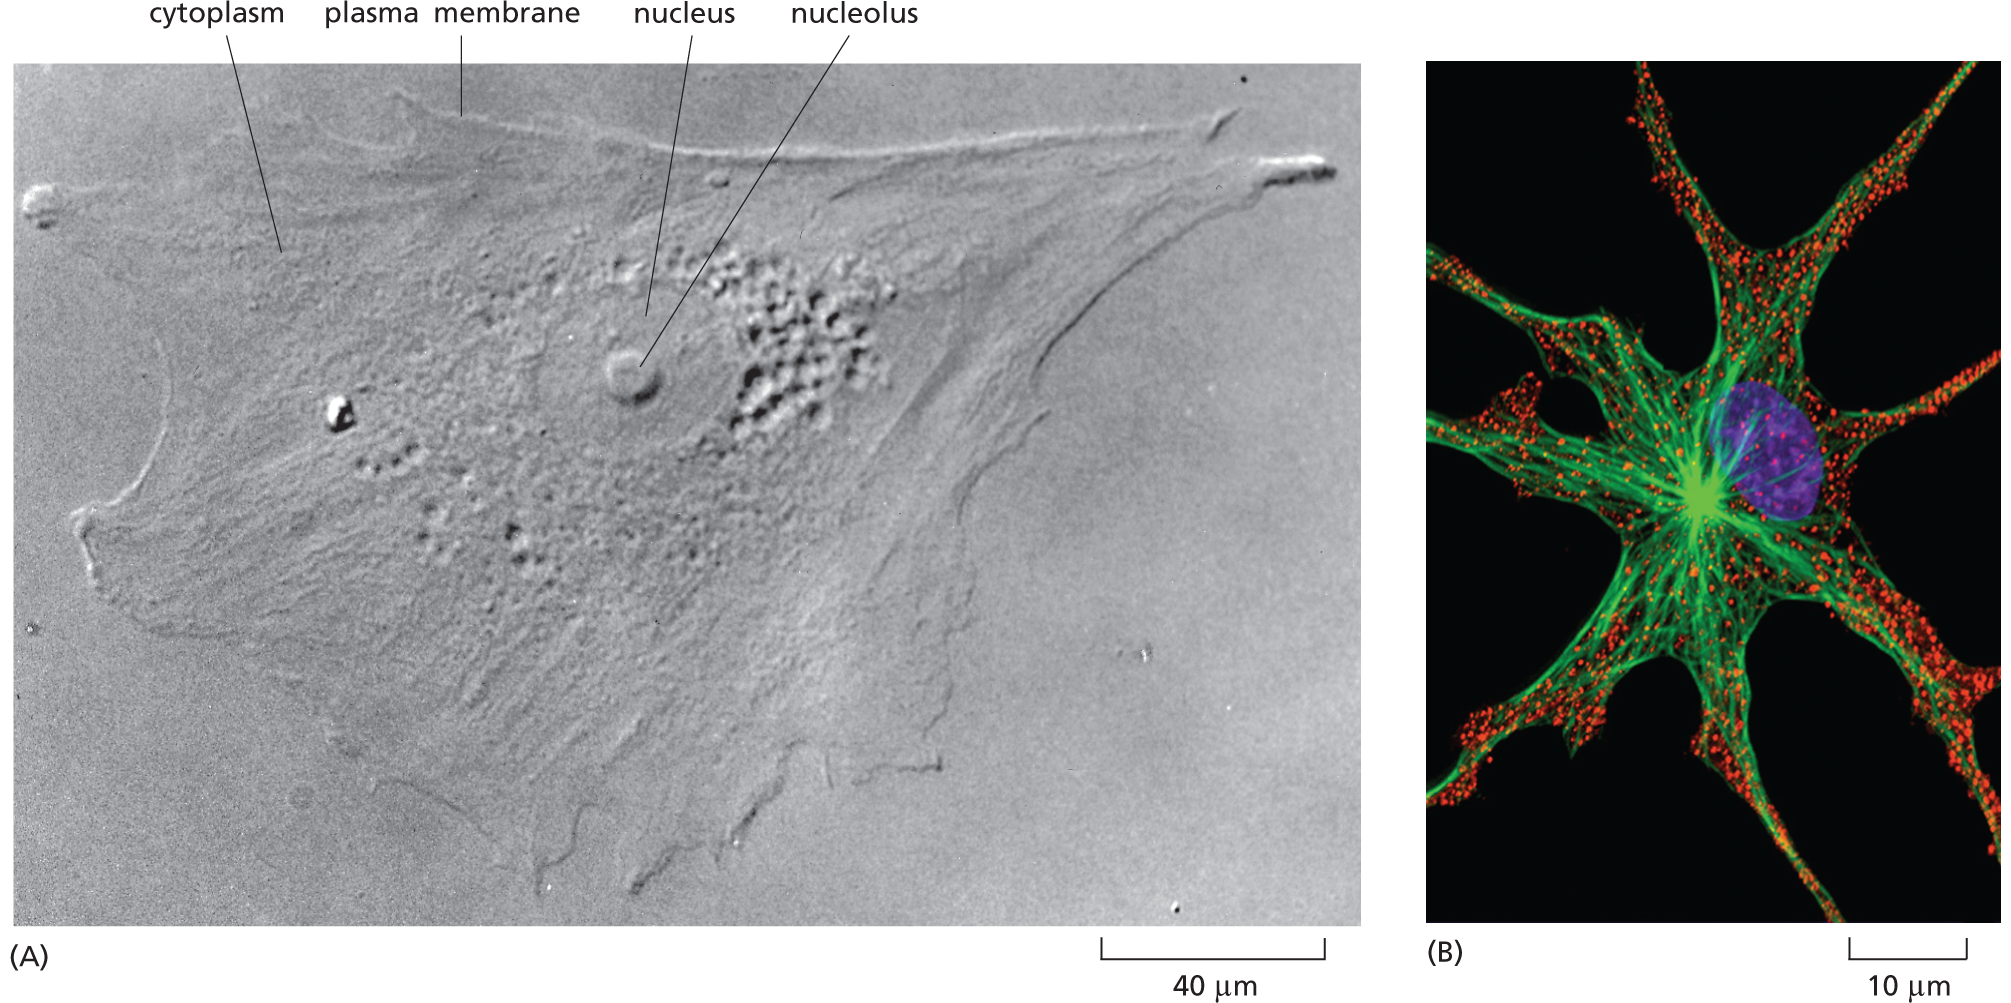
Micrograph A shows an irregularly shaped human skin cell with a nucleus at the center, surrounded by cytoplasm, and an outer plasma membrane, on a scale of 40 micrometers.
Micrograph B shows a star-shaped cell from a frog with a central nucleus, and long filaments extending outward; its tapering ends are crowded with ovoid granules. The scale reads 10 micrometers.
Figure 1–7Some of the internal structures of a cell can be seen with a light microscope. (A) A cell taken from human skin and grown in culture was photographed through a light microscope using interference-contrast optics (described in Panel 1–1, pp. 12–13). The nucleus is especially prominent, as is the small, round nucleolus within it (discussed in Chapter 5; and see Panel 1–2, p. 27). (B) A pigment cell from a frog, stained with fluorescent dyes and viewed with a confocal fluorescence microscope (discussed in Panel 1–1). The nucleus is shown in purple, the pigment granules in red, and the microtubules—a class of protein filaments in the cytoplasm—in green. (A, courtesy of Casey Cunningham; B, courtesy of Stephen Rogers and the Imaging Technology Group of the Beckman Institute, University of Illinois, Urbana.)
As shown in Figure 1–6B and Figure 1–7A, typical animal cells visualized in these ways have a distinct anatomy. They have a sharply defined boundary, indicating the presence of an enclosing membrane, the plasma membrane. A large, round structure, the nucleus, is prominent near the middle of the cell. Around the nucleus and filling the cell’s interior is the cytoplasm, a transparent substance crammed with what seems at first to be a jumble of miscellaneous objects. With a good light microscope, one can begin to distinguish and classify some of the specific components in the cytoplasm, but structures smaller than about 0.2 μm—about half the wavelength of visible light—cannot normally be resolved; in other words, they cannot be distinguished from the objects that surround them and appear as a single blur.
In recent years, however, new types of light microscope called fluorescence microscopes have been developed that use sophisticated methods of illumination and electronic image processing to see fluorescently labeled cell components in much finer detail (Figure 1–7B). The most recent superresolution fluorescence microscopes, for example, can push the limits of resolution down even further, to about 20 nanometers (nm). That is the size of a single ribosome, the large macromolecular complex that translates RNAs into proteins. These superresolution techniques are described further in Panel 1–1 (pp. 12–13).
The Fine Structure of a Cell Is Revealed by Electron Microscopy
For the highest magnification and best resolution, one must turn to an electron microscope, which can reveal details down to a few nanometers. Preparing cell samples for the electron microscope is a painstaking process. Even for light microscopy, a tissue often has to be fixed (that is, preserved by pickling in a reactive chemical solution), supported by embedding in a solid wax or resin, cut, or sectioned, into thin slices, and stained before it is viewed. (The tissues in Figure 1–6 were prepared in this way.) For electron microscopy, similar procedures are required, but the sections have to be much thinner and there is no possibility of looking at living cells.
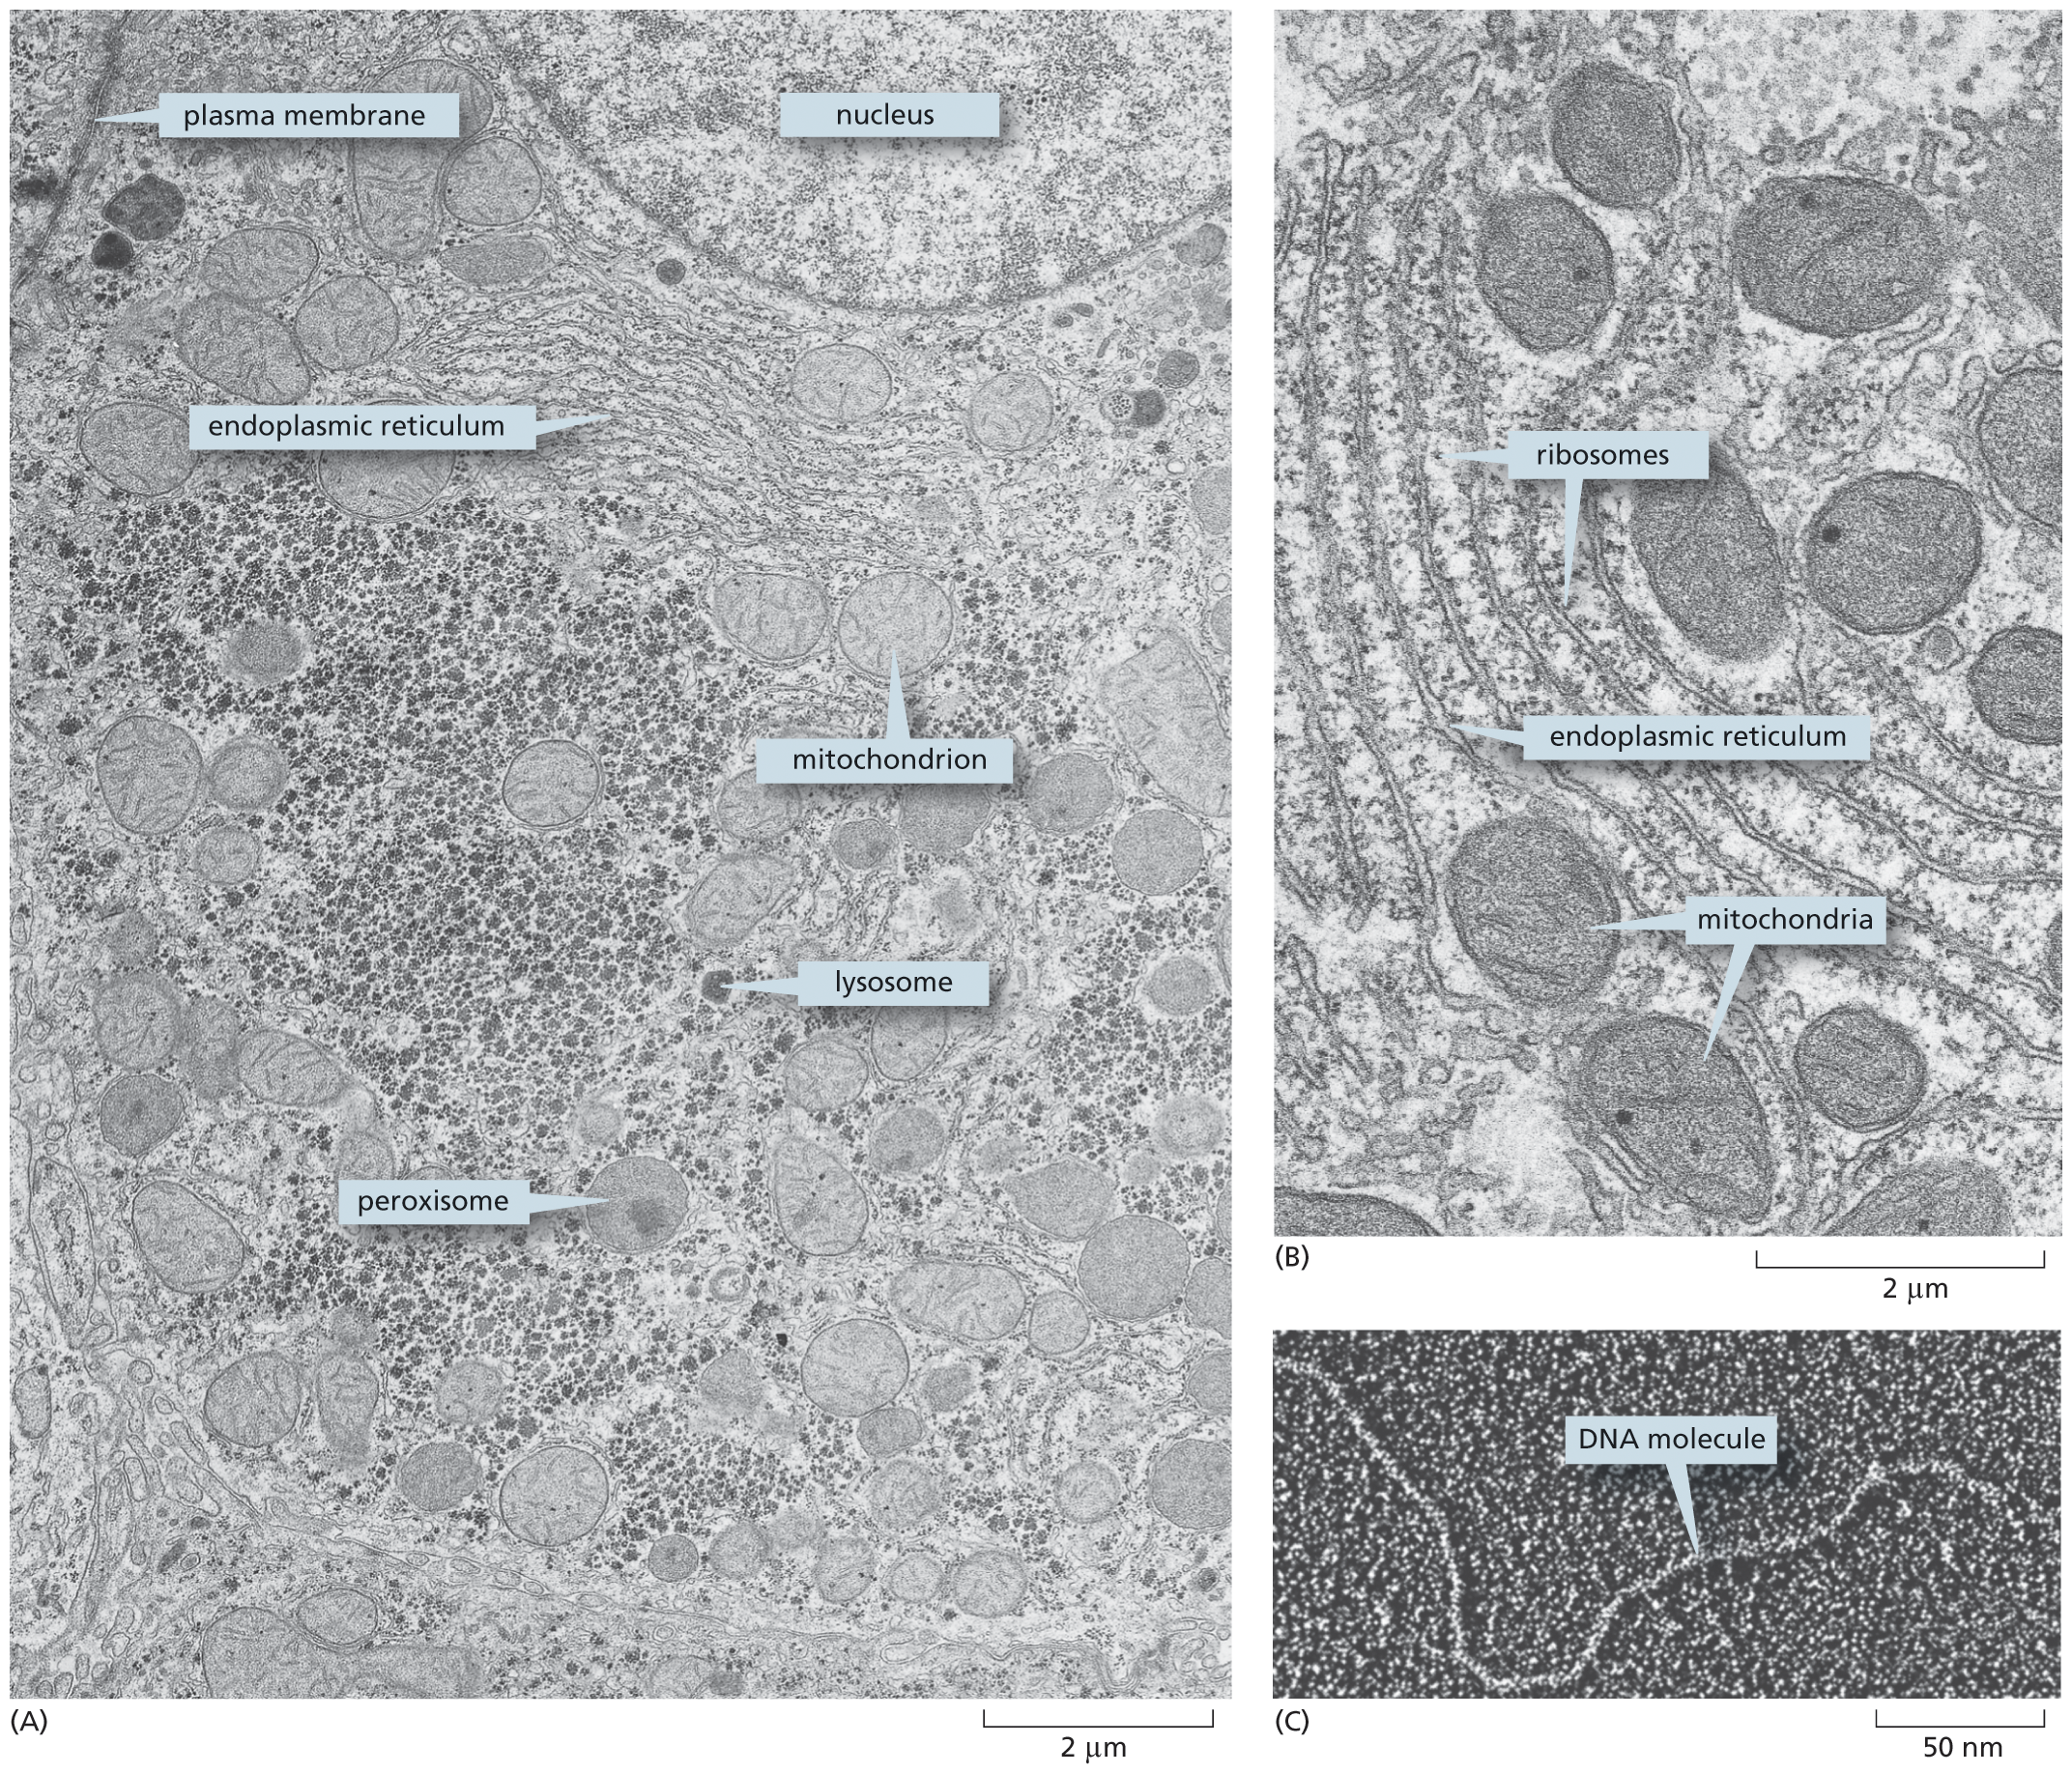
When thin sections are cut, stained with electron-dense heavy metals, and placed in the electron microscope, much of the jumble of cell components becomes sharply resolved into distinct organelles—separate, recognizable substructures with specialized functions that are often only hazily defined with a conventional light microscope. The delicate plasma membrane can be seen surrounding the cell, and similar membranes, called internal membranes, form distinct boundaries around many of the organelles inside (Figure 1–8A and B). All of these membranes are only about 5 nm—or two molecules—thick (as discussed in Chapter 11). When the resolution of the electron microscope is pushed, even individual large molecules can readily be seen (Figure 1–8C).
More information
Micrographs A through C show fine structures of a liver cell.
Micrograph A shows a thin section of a liver cell; components such as nucleus, surrounded by endoplasmic reticulum, mitochondrion, lysosome, and peroxisome are labeled, on a scale of 2 micrometers.
Micrograph B shows a magnified view of a portion of cytoplasm; thin thread like striations are labeled ribosomes, the organelle bound to the ribosomes is labeled endoplasmic reticulum, and mitochondria are shown in between the ribosomes, on a scale of 2 micrometers.
Micrograph C shows a thin strand labeled as D N A molecule on a scale of 50 micrometers.
Figure 1–8The fine structure of a cell can be seen in a transmission electron microscope. (A) Thin section of a liver cell, showing the enormous amount of detail that is visible. Some of the components to be discussed later in this chapter are labeled; they are identifiable by their size, location, and shape. (B) A small region of the cytoplasm at higher magnification. The smallest structures that are clearly visible are the ribosomes, each of which is made of 80–90 or so individual protein and RNA molecules; some of the ribosomes are free in the cytoplasm, while others are bound to a membrane-enclosed organelle—the endoplasmic reticulum—discussed later (see Figure 1–23). (C) Portion of a long, threadlike DNA molecule isolated from a cell and viewed by electron microscopy. The DNA has been artificially thickened to enhance its visibility. (A and B, by permission of E.L. Bearer and Daniel S. Friend; C, courtesy of Mei Lie Wong.)
The type of electron microscope used to look at thin sections of tissue is known as a transmission electron microscope. This instrument is, in principle, similar to a light microscope, except that it transmits a beam of electrons rather than a beam of light through the sample. Another type of electron microscope—the scanning electron microscope—scatters electrons off the surface of the sample and so is used to look at the surface detail of cells and other structures. These techniques, along with the different forms of light microscopy, are reviewed in Panel 1–1 (pp. 12–13).
Most conventional electron microscopes cannot visualize the individual atoms that make up biological molecules (Figure 1–9). To study the cell’s key components in atomic detail, biologists have developed even more sophisticated tools. Techniques such as x-ray crystallography or an enhanced form of electron microscopy called cryo-electron microscopy, for example, can be used to determine the precise positioning of atoms within the three-dimensional structure of protein molecules and complexes (discussed in Chapter 4).
More information
Illustrations A and B compare the sizes of cells and their components. The chart depicts the approximate sizes, measurable units and the device used to visualize the cells. The details are as follows:
Atom- Size: up to 0.2 nanometers and device: electron microscope.
Molecules- Size: between 0.2 nanometers and 110 nanometers and device: super-resolution fluorescence microscope.
Organelles- Size: between 110 nanometers and 11 micrometers and device: light microscope.
Cells- Size: between 1100 nanometers to 0.2 millimeters and it is visible with unaided eyes.
A note below the chart shows 1 meter equals 10 cubed millimeters, 10 to the sixth power micrometers, and 10 to the ninth power nanometers.
Illustration B shows 6 panels that depict the scaling of a cell from skin to a cluster of atoms.
The scaling details from first panel to the sixth panel are as follows: thumb, 20 millimeters; a section of skin in the thumb with multiple ridges, 2 millimeters; skin cells that make up the layers of the epidermis, 0.2 millimeters; a grouping of about four cells, 20 micrometers; a mitochondria inside one of the cells, 2 micrometers; a grouping of ribosomes inside the mitochondria, 0.2 micrometers; a single ribosome, 20 nanometers; several atoms that make up the ribosome, 2 nanometers; a few atoms, 0.2 nanometers.
Figure 1–9How big are cells and their components? (A) This chart lists sizes of cells and their component parts, the units in which they are measured, and the instruments needed to visualize them. (B) Drawings convey a sense of scale between living cells and atoms. Each panel shows an image that is magnified by a factor of 10 compared to its predecessor—producing an imaginary progression from a thumb, to skin, to skin cells, to a mitochondrion, to a ribosome, and ultimately to a cluster of atoms forming part of one of the many protein molecules in our bodies. Note that ribosomes are present inside mitochondria (as shown here), as well as in the cytoplasm.
PANEL 1–1MICROSCOPY
CONVENTIONAL LIGHT MICROSCOPY
More information
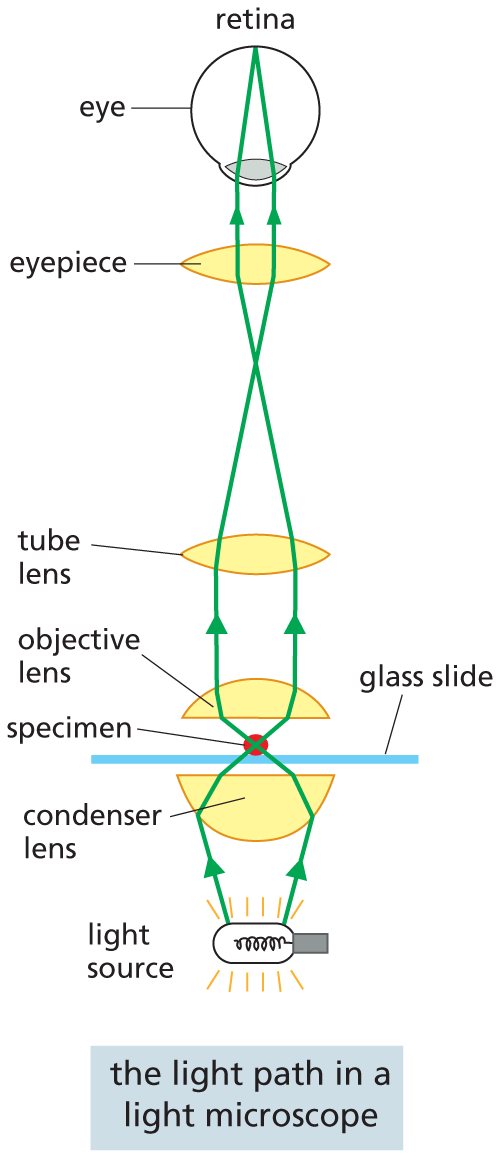
An illustration shows the light path in a microscope. The light from the source passes through the following parts of the microscope and finally reaches the retina of the eye. The labeled parts are as follows: condenser lens, glass slide, specimen, objective lens, tube lens, and eyepiece. Text reads: A conventional light microscope allows us to magnify cells up to 1000 times and to resolve details as small as 0.2 micrometers (200 nanometers), a limitation imposed by the wavelike nature of light, not by the quality of the lenses. Three things are required for viewing cells in a light microscope. First, a bright light must be focused onto the specimen by lenses in the condenser. Second, the specimen must be carefully prepared to allow light to pass through it. Third, an appropriate set of lenses (objective, tube, and eyepiece) must be arranged to focus an image of the specimen in the eye.
More information
A photo shows a man using a microscope. He is sitting at a desk and wearing a blue shirt.
A conventional light microscope allows us to magnify cells up to 1000 times and to resolve details as small as 0.2 μm (200 nm), a limitation imposed by the wavelength of light, not by the quality of the lenses. Three things are required for viewing cells in a light microscope. First, a bright light must be focused onto the specimen by lenses in the condenser. Second, the specimen must be carefully prepared to allow light to pass through it. Third, an appropriate set of lenses (objective, tube, and eyepiece) must be arranged to focus an image of the specimen in the eye.
LOOKING AT UNSTAINED SAMPLES
More information
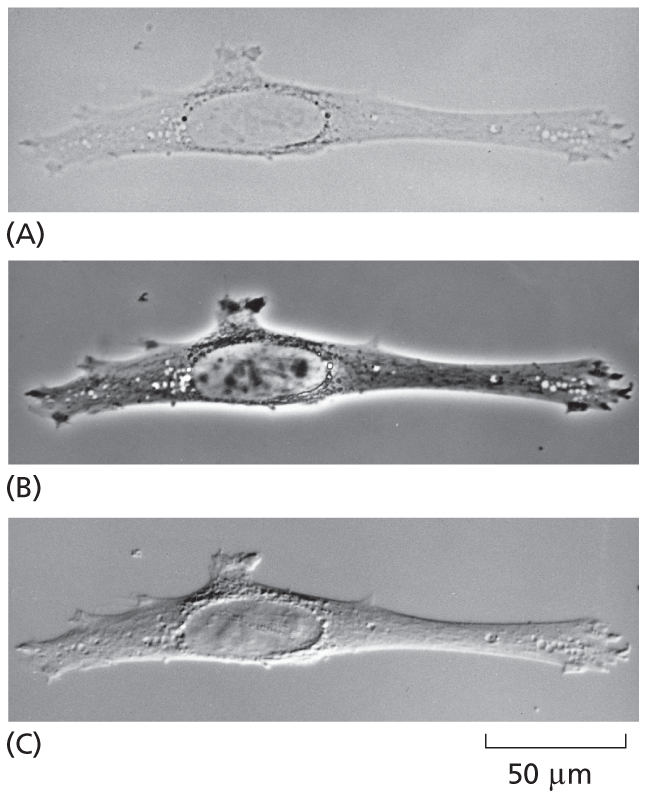
Looking at unstained samples. Micrograph A shows a fibroblast with low contrast; micrograph B shows a fibroblast with high brightness; and micrograph C shows a fibroblast with high contrast. All the micrographs are depicted at a scale of 50 micrometers.
The same unstained animal cell (a fibroblast) viewed with
(A) the simplest, bright-field optics;
(B) phase-contrast optics;
(C) interference-contrast optics.
The two latter systems exploit differences in the way light travels through regions of the cell with differing refractive indices. All three images can be obtained on the same microscope simply by interchanging optical components.
FIXED SAMPLES
More information
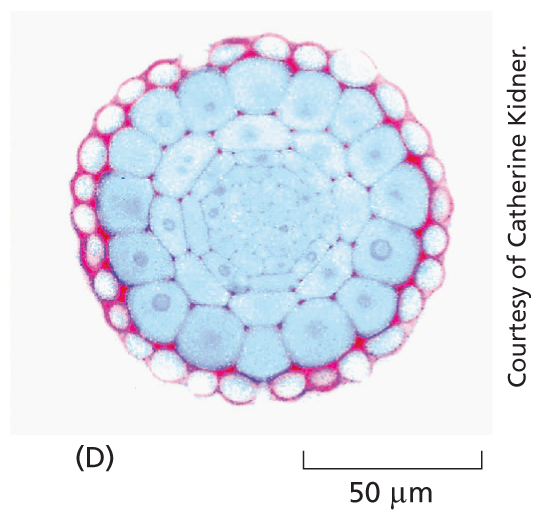
Fixed samples: Micrograph D shows a section of a plant root tip with tightly packed cells arranged circularly at a scale of 50 micrometers.
Most tissues are neither small enough nor transparent enough to examine directly in the microscope. Typically, therefore, they are chemically fixed and cut into thin slices, or sections, that can be mounted on a glass microscope slide and subsequently stained to reveal different components of the cells. A stained section of a plant root tip is shown here (D).
FLUORESCENCE MICROSCOPY
More information
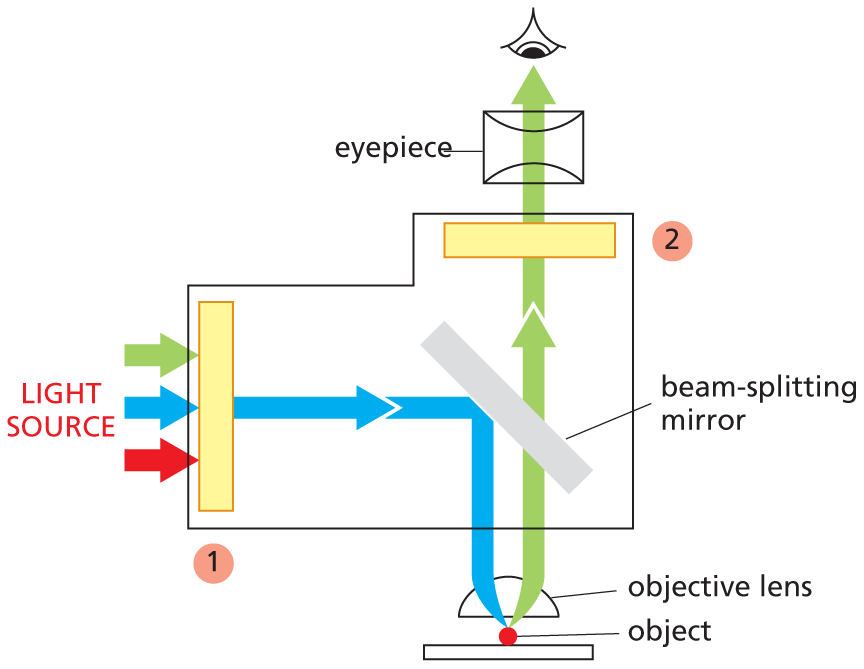
An illustration shows the light path in a fluorescence microscopy. The light from the source passes through the following parts of the microscope and finally reaches the retina of the eye. The labeled parts are as follows: object, objective lens, beam-splitting mirror, an eyepiece, and two filters. Text reads: Fluorescent dyes used for staining cells are detected with the aid of a fluorescence microscope. This is similar to an ordinary light microscope, except that the illuminating light is passed through two sets of filters (yellow). The first filters the light before it reaches the specimen, passing only those wavelengths that excite the particular fluorescent dye. The second blocks out this light and passes only those wavelengths emitted when the dye fluoresces. Dyed objects show up in bright color on a dark background.
Fluorescent dyes used for staining cells are detected with the aid of a fluorescence microscope. This setup is similar to an ordinary light microscope, except that the illuminating light is passed through two sets of filters (yellow). The first (1) filters the light before it reaches the specimen, passing only those wavelengths that excite the particular fluorescent dye. The second (2) blocks out this light and passes only those wavelengths emitted when the dye fluoresces. Dyed objects show up in bright color on a dark background.
FLUORESCENT PROBES
More information
A micrograph shows spindle shaped microtubule proteins with green pigments in its tapering ends and a light blue shaded center region. Each cell is about 5 micrometers long.
Fluorescent molecules absorb light at one wavelength and emit it at another, longer wavelength. Some fluorescent dyes bind specifically to particular molecules in cells and can reveal their location when the cells are examined with a fluorescence microscope. In these dividing nuclei in a fly embryo, the stain for DNA fluoresces blue. Other dyes can be coupled to antibody molecules, which then serve as highly specific staining reagents that bind selectively to particular molecules, showing their distribution in the cell. Because fluorescent dyes emit light, they allow objects even smaller than 0.2 μm to be seen. Here, microtubule proteins in the mitotic spindle (see Figure 1–29) are stained green with a fluorescent antibody.
CONFOCAL FLUORESCENCE MICROSCOPY
More information
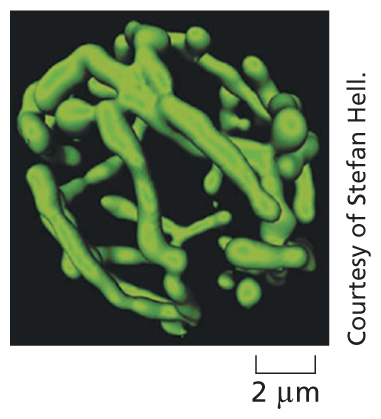
A micrograph shows a three dimensional view of a branched mitochondrion on a scale of 2 micrometers. The mitochondrion looks like a ball of strands with the ball about 8 micrometers wide.
A confocal microscope is a specialized type of fluorescence microscope that builds up an image by scanning the specimen with a laser beam. The beam is focused onto a single point at a specific depth in the specimen, and a pinhole aperture in the detector allows only fluorescence emitted from this point to be included in the image. Scanning the beam across the specimen generates a sharp image of the plane of focus—an optical section. A series of optical sections at different depths are then combined to form a three-dimensional image, such as this highly branched mitochondrion in a living yeast cell.
SUPERRESOLUTION FLUORESCENCE MICROSCOPY
Recently, several ingenious technical advances have allowed fluorescence microscopes to break the usual resolution limit of 200 nm. One such technique uses a sample that is labeled with molecules whose fluorescence can be reversibly switched on and off by different colored lasers. The specimen is scanned by a nested set of two laser beams, in which the central beam excites fluorescence in a very small spot of the sample, while a second beam—wrapped around the first—switches off fluorescence in the surrounding area. A related approach allows the positions of individual fluorescent molecules to be accurately mapped while others nearby are switched off. Both approaches slowly build up an image with a resolution as low as 20 nm. These new super resolution methods are being extended into 3-D imaging and real-time live cell imaging.
More information
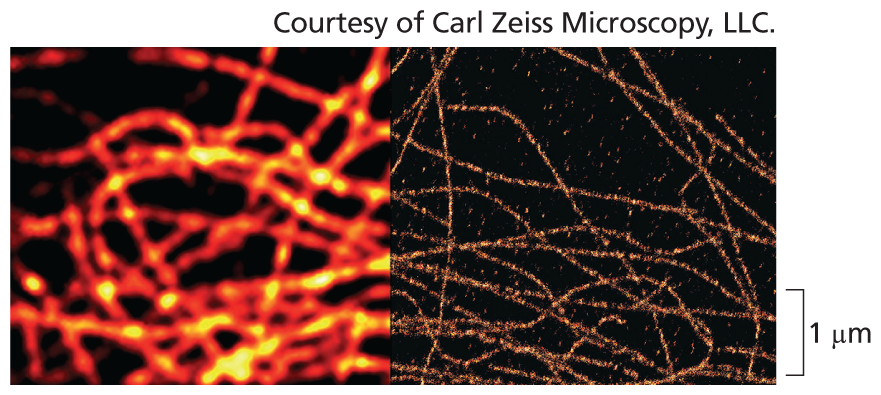
Two micrographs of microtubules, one using a conventional fluorescence microscope and the other with a super-resolution optics. They both show orange strands. The first micrograph is blurred and the second imagery is sharp and clear on a scale of 1 micrometer.
Microtubules viewed with conventional fluorescence microscope (left) and with superresolution optics (right). In the superresolution image, the microtubules can be clearly seen; their actual size is only 25 nm in diameter.
TRANSMISSION ELECTRON MICROSCOPY
More information
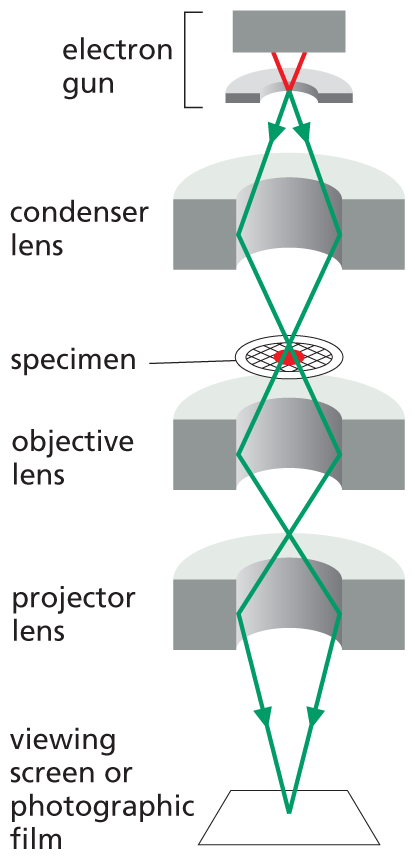
An illustration shows the parts of a transmission electron microscope. From top to bottom these are the electron gun, condenser lens, specimen, objective lens, projector lens, and viewing screen or photographic film.
More information
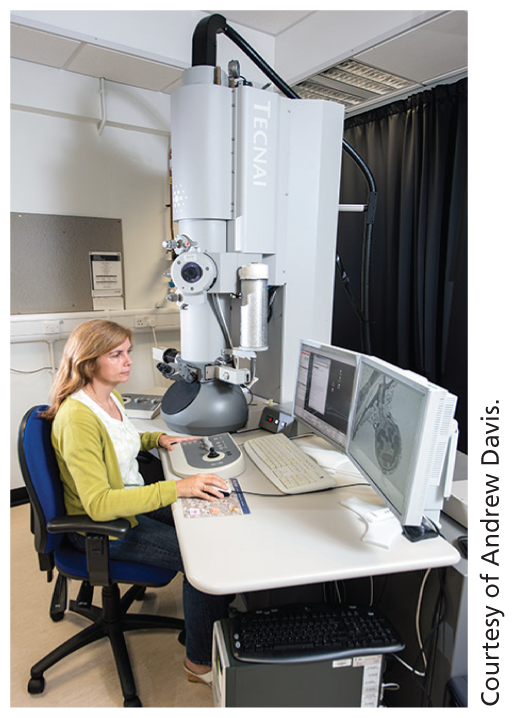
A photo shows a woman working on a computer inside a laboratory. She is sitting at a desk, looking at computer screens. A large machine is behind her.
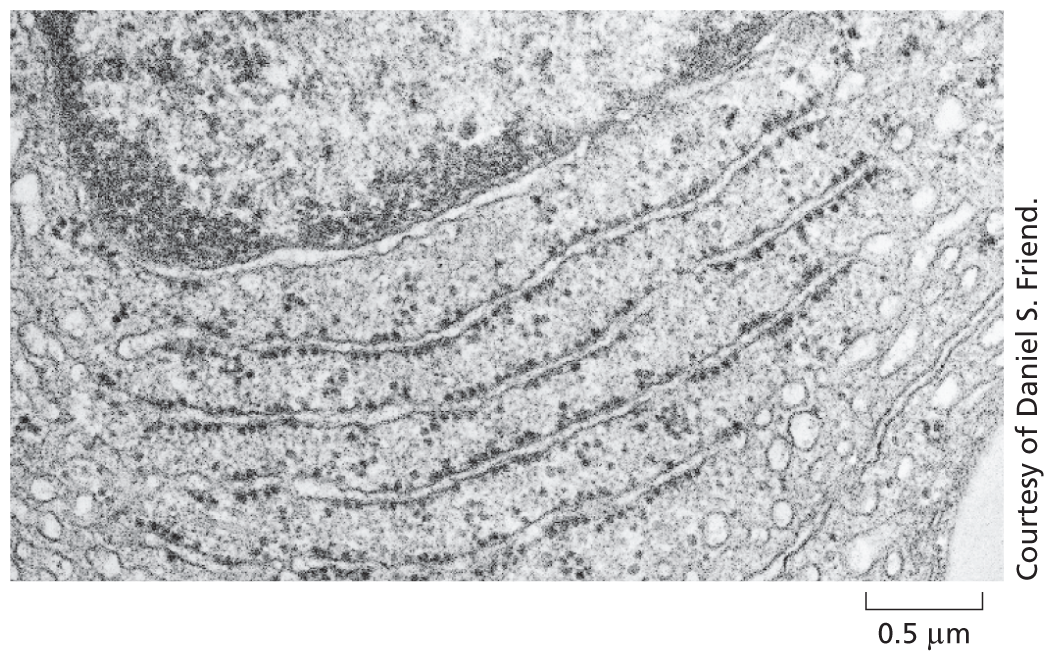
The electron micrograph below shows a small region of a cell in a thin section of testis. The tissue has been chemically fixed, embedded in plastic, and cut into very thin sections that have then been stained with salts of uranium and lead.
More information
A micrograph shows an enlarged view of a cell at a scale of 0.5 micrometer. Small structures within the cell are visible.
The transmission electron microscope (TEM) is in principle similar to a light microscope, but it uses a beam of electrons instead of a beam of light, and magnetic coils to focus the beam instead of glass lenses. Because the wavelength of electrons is so short, the resolution is greatly increased, but the specimen must be very thin. Contrast is usually introduced by staining the specimen with electron-dense heavy metals. The specimen is then placed in a vacuum in the microscope. The TEM has a useful magnification of up to a million-fold and can resolve details as small as about 1 nm in biological specimens.
SCANNING ELECTRON MICROSCOPY
More information
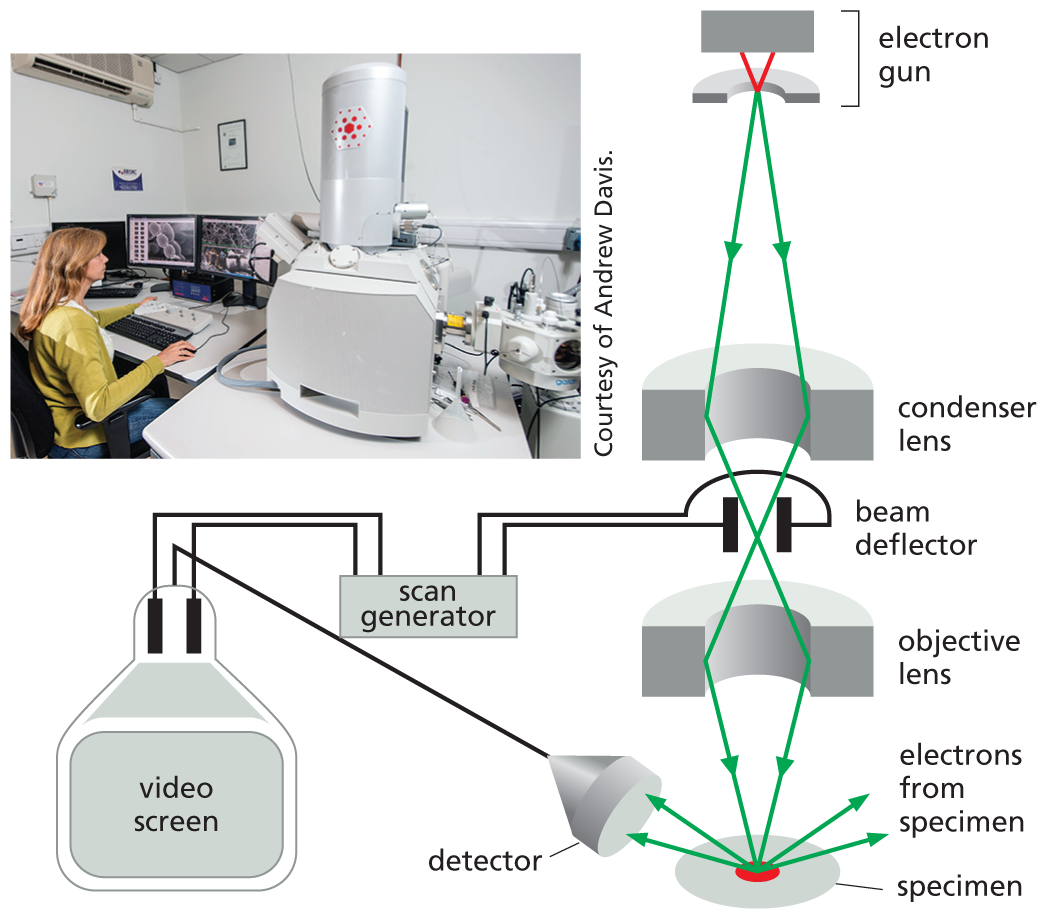
A photo shows a woman working on a computer inside a laboratory. She is sitting at a desk, looking at computer screens. A large machine is on her right side.; An illustration shows the parts of a scanning electron microscope. These include the electron gun, condenser lens, beam deflector, objective lens, specimen, video screen, scan generator, and detector. The electron gun emits two beams of electrons which pass through the condenser lens, cross each other in the beam deflector, pass through the objective lens, and converge on the specimen. The detector receives electrons that bounce off the specimen and sends them to the video screen. The beam deflector is attached to a scan generator which is also attached to the video screen.
In the scanning electron microscope (SEM), the specimen, which has been coated with a very thin film of a heavy metal, is scanned by a beam of electrons brought to a focus on the specimen by magnetic coils that act as lenses. The quantity of electrons scattered or emitted as the beam bombards each successive point on the surface of the specimen is measured by the detector, and is used to control the intensity of successive points in an image built up on a video screen. The microscope creates striking images of three-dimensional objects with great depth of focus and can resolve details between 3 nm and 20 nm, depending on the instrument.
More information
Two micrographs show stereocilia projecting from a hair cell in the inner ear, one using scanning electron transmission microscopy and the other with a light microscopy. The first one is a high resolution 3 dimensional micrograph on a scale of 1 micrometer and the second one shows a blurred imagery on a scale of 5 micrometers.
Scanning electron micrograph of stereocilia projecting from a hair cell in the inner ear (left). For comparison, the same structure is shown by light microscopy, at the limit of its resolution (above).
Instrument for viewing extremely small objects. Some use a focused beam of visible light and are used to examine cells and organelles. Others use a beam of electrons and can be used to examine objects as small as individual molecules.
Instrument used to visualize a specimen that has been labeled with a fluorescent dye; samples are illuminated with a wavelength of light that excites the dye, causing it to fluoresce.
Instrument that passes a beam of electrons through the specimen to reveal and magnify the structures of very small objects, such as organelles and large molecules.
A discrete structure or subcompartment of a eukaryotic cell that is specialized to carry out a particular function. Examples include mitochondria and the Golgi apparatus.